
December Grow Me Now!
Sweet Table Grapes
If you’ve ever been disappointed (and who hasn’t) by those tasteless, generic Australian and South American table grapes that appear in our supermarkets, it’s not surprising. Supermarket grapes are often picked well before their sugar content is at its best, in order to ensure they travel well. The result is that they have tough, sometimes bitter, skins, and their juice tastes like flavourless sugar water. But the thing is, we know we can grow much better grapes in our own greenhouses. All it takes is the determination to carry out a few simple tasks, especially in the month of December.
Source
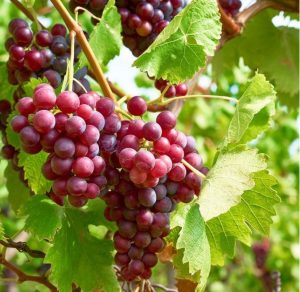
Table grape vines traditionally go into the ground in late autumn or early spring. ‘Albany Surprise’ (large, juicy, blue-black fruit with a spicy flavour) has been a favourite indoor table grape for many years, and well cared for, vines can produce bunches weighing between 200 and 350g. ‘Iona’ is another hardy grape that suits cooler regions, while ‘Canadise’ is a sweet, red, seedless grape delivering up the goods in mid season. Always source your vines from close-to-home nurseries that will understand the varieties that suit your area best.
Ground work
Although it sounds extravagant to devote an entire greenhouse to a grape, doing so will give the best results. That’s because, a grape, in full leaf, shuts out a good deal of light, and nothing much else will thrive beneath its canopy (of course, over the winter months, when the vine is deciduous, that’s when you can use the ground beneath to grow a winter vegetable crop, or to store potted citrus and other frost tender treasures).
Before purchasing a grape, it pays to secure wire supports across the width of the greenhouse, above head height. This will allow for eventually training the vine back and forwards across the supports so that the bunches of grapes hang down into the ripening heat and light, rather than getting caught up among the shade of leaves and leaders. Training the vine across supports also helps to keep foliage away from the glass or skin of your greenhouse where it can attract condensation, remain damp, and encourage mildew to set in.
Ventilation will be required to maintain the health of the indoor vine, but it also pays to bear in mind that birds are one of the greatest threats to the crop, followed by wasps. So, if your greenhouse doesn’t come with a mesh door, get one, or create your own with a mesh curtain as soon as young fruit appears on the vines. You will also have to cover vents with mesh to keep wasps at bay (do so carefully when working around glass) .
Sowing and planting
If you don’t wish to be forever watering your grapevine, plant it close against the side of your greenhouse, and lead it into the interior of the structure by safely removing a section of glass or polythene skin (where this is not possible, consider leading the vine in under the foundation of your greenhouse).
The hole you dig for the vine should be twice the size of the root ball. Dig into the hole a mixture of compost, blood and bone meal, manure and, if the soil is heavy and clayish, a shovel or two of fine grit to assist with drainage. PH should be between 5.5-7.0, so adjust with lime if necessary. Keep the ground around the planting moist for the first year by watering once a week in dry conditions.
Maintenance
Before growth properly takes off in mid-spring, the root area can be sprinkled with an organic fertilizer and an extra feed of dried blood. When the leaves are fully open, a high potassium fertilizer will benefit the vine. To supply it, soak kelp in fresh water for a few days, then water onto the root area. Continue with this regime every week throughout the growing period, stopping only when the grapes begin to colour up. As the heat increases, mulch around the root area of the vine to keep the ground cool.
Pruning
As the vine puts on spring growth, it will produce laterals (this is the new growth which sprouts from the woody ‘trunk’ of the vine). In a new vine, several of these laterals are left to grow unchecked. Eventually, they will form the main, woody framework of the vine. Other laterals, however, should be pinched out at the ends after they have developed 2-3 bunches of grapes. ‘Pinching out’ doesn’t stop the rampant growth altogether, however. You will need to repeat the treatment throughout the summer. This will also help to thin out leaves, and let in the light.
Pollination
Grapes are self-pollinating, but they do appreciate a helping hand from their grower. Each time you are in the greenhouse, gently shake the stems to encourage pollen to fall.
Pest and plague
Although many growers use a range of chemicals to stave off mildew, one of the best organic treatments for undercover grapes is seaweed water. Sprayed onto leaves early in the day (so the foliage is dry again by night) it appears to deter fungal disease such as black spot and mildew.
Post harvest
Winter pruning of greenhouse grapes is essential for the good of the following year’s crop. Old wood from which bunches have grown, is removed, while new laterals that will support next year’s harvest, are tied down.
When work on the wood has been completed, it’s time to check supports, mend any holes in the skin or glass, or in the mesh bird covering – because it won’t be long until the next season is on its way.
Tips
If you prefer to grow your undercover grape in a pot, rather than outdoors, choose a large-ish container at least 30cm in diameter, and 65cm deep.
Use scissors to harvest so you don’t damage the plant tissue with a tug.
If you are looking for the perfect shaped bunch, don’t be afraid to trim off a few grapes from a bunch (while they are still very small) with nail scissors.
Remove tendrils that are not supplying obvious support (they only get tangled in the bunches).